Game Scene Presentation:
Game Scene Final Post:
The Triple A 3.73 Group 2 chose for our game scene to recreate the Pirates of the Nile Delta and Layla Hassan mission in the game Assassin's Creed: Origins.
- Concept Art:


Here is a list of all the projects I worked on in the scene:
- Researched concept art/videos
- Modeled and UV’d assigned assets in Maya:

- Textured and baked high-poly assigned assets in Substance Painter
- Imported all assigned assets into Unity
- Created Fire particle system
- Created Glowing particle effect
- Audio in Unity scene
- Organized the group’s Maya file
- Created the final turn in file
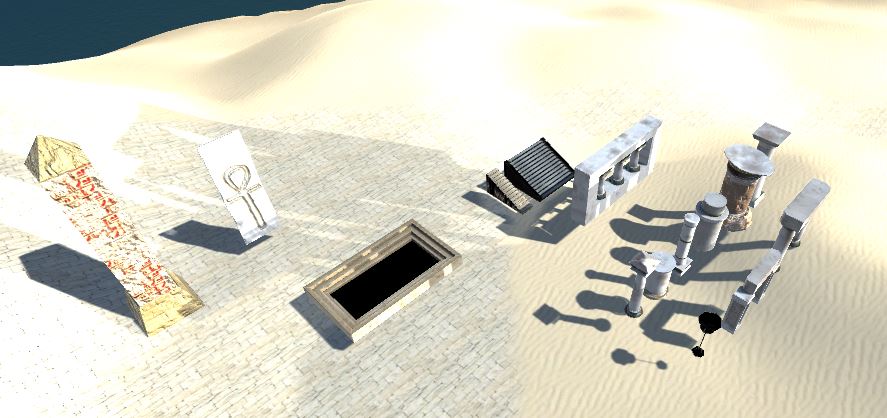
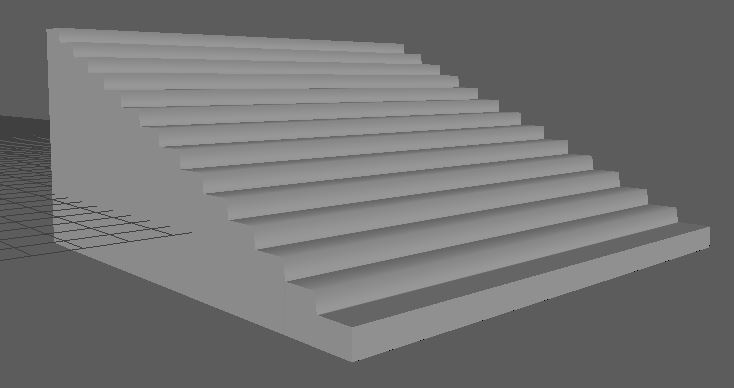
Tapestry, Pillar, Pool, Grand Stairs, and Temple Stairs:
Modeled:

Textured:

Texture Maps:

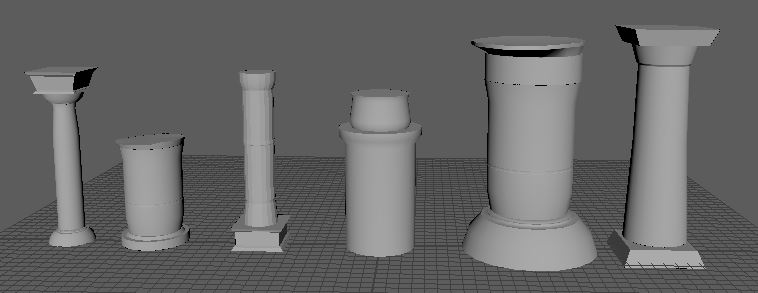
Columns, Arches, Wall Relief, and Torch:
Modeled:

Textured:

Texture Maps:
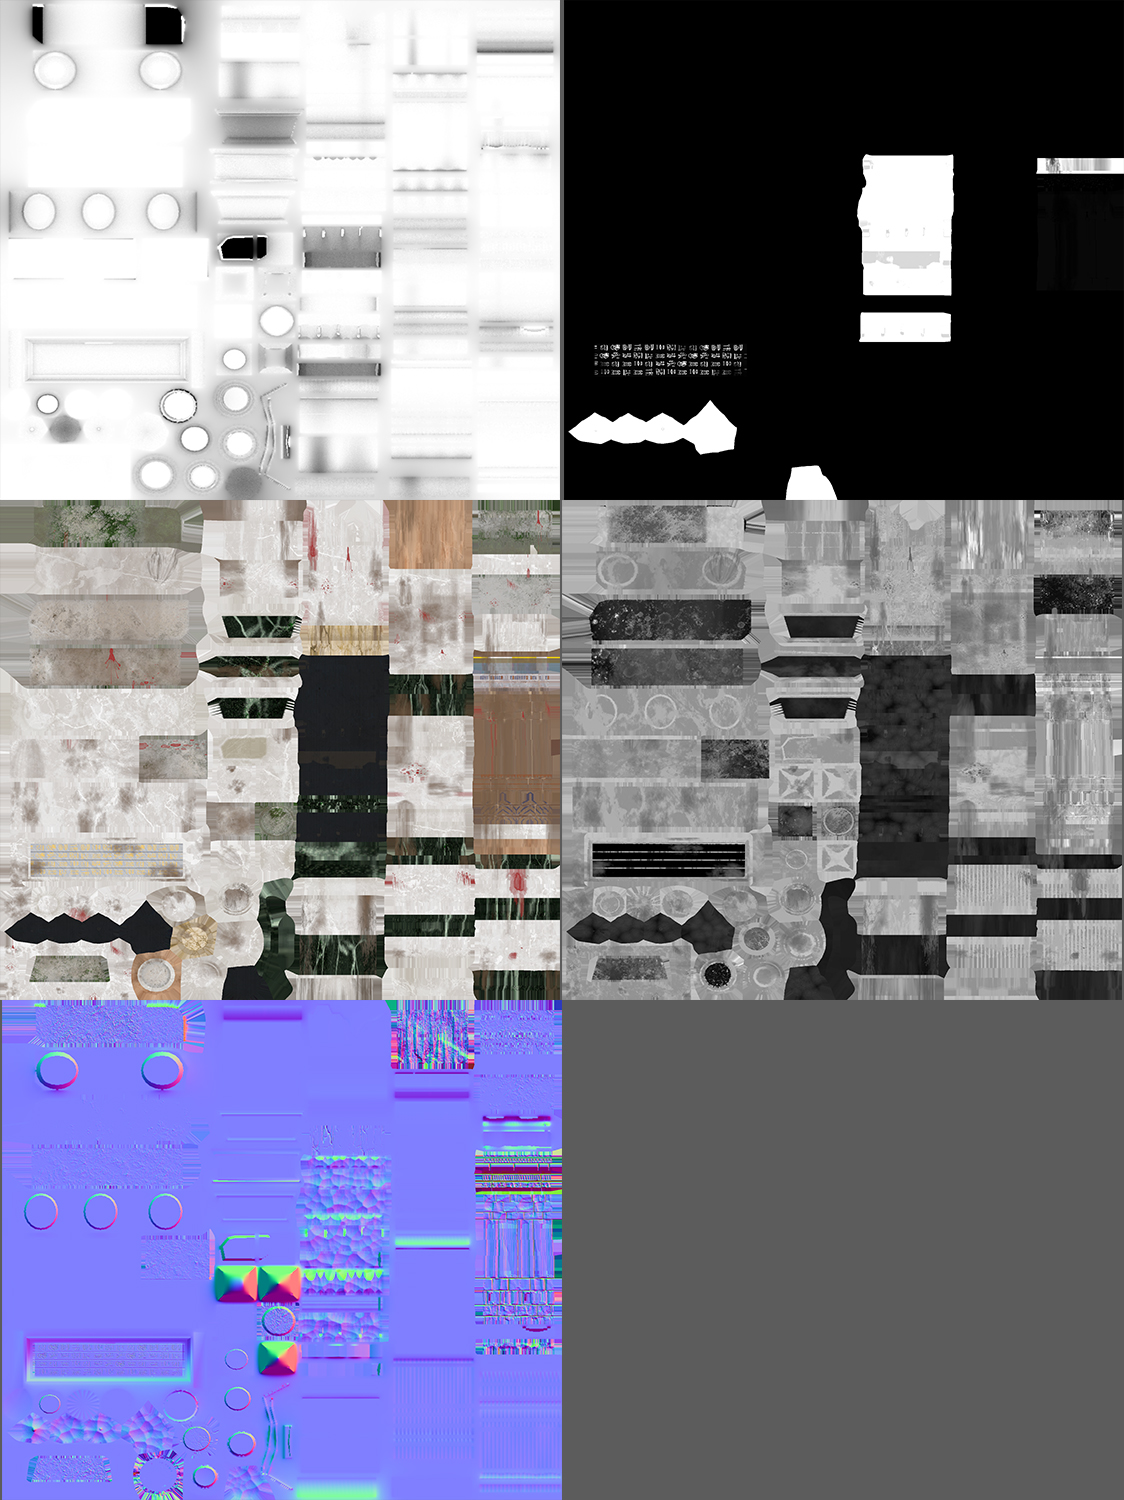
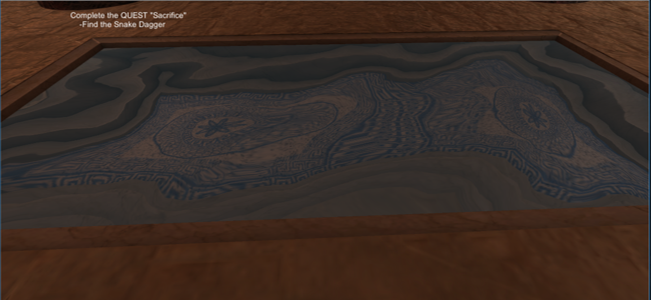
Snake Dagger:
Modeled:

Textured:

Texture Maps:

Anubis Statue:
Modeled:

Textured:


Fire Particle System:

Glowing Particle Effect:

Audio:
Fire Audio:
http://soundbible.com/1902-Fire-Burning.html
Wind Audio:
Water Audio:
http://soundbible.com/1144-River.html
Door Audio:
http://soundbible.com/905-Cave-In-Sound.html
Unity:


The software Maya was used to model and uv all of the asset models. While the software Substance Painter was used to bake the high polys and to texture all of the asset models. I used SoundBible.com to find and use audio in the Unity Scene.
- An issue our group faced was that the tri count of our scene was more than 150,000 tris beneath the 300,000 to 500,000 tri count of our project.
- The solution was for Austin to model, uv, and texture these stone bricks, houses, and other assets for us to include in the scene.
- After populating the main island with the temple and the surrounding islands we reached the minimum 300,000 tri count.
- The second issue was that I modeled the pool, Alex modeled the temple and temple floor, and Austin modeled the secret tunnel underneath the temple. The issue became that our measurements were off when we put everything into Unity.
- The solution was for Austin to scale up the width and length of his tunnel to fit the opening of the temple floor that Alex built. I in turn also scaled up the width of the pool to better fit the temple floor opening.
- I learned that communication would have solved this problem if we had kept measurements of all of our objects so we could reference them in relation to the other objects in the scene.
- The main problem I encountered was that my individual Maya scene became corrupted the last week before the project was due.
- The first step I did was to search the internet for solutions; these solutions were too:
- Create a new Maya scene and import the corrupt file
- Re-open corrupt file in a older Maya file
- I compared the data on a older file vs. the corrupt file
- The Final Solution:
- Justin, the assistant professor, opened the corrupt Maya file in Notepad++ and searched for -nan and then replaced -nan with 0.
- This fixed the corrupt Maya file and I was able to turn everything in on time.
- Note: Save Maya file as ASCII format, not Binary.
- As a Binary is compressed and can only be open in Maya. In a ASCII file the information is saved and the file can be opened in Notepad++ and the information can be uncorrupted.
I learned that communication is key in a large scale group project. As anything anyone does will have an impact on someone else's asset or assignment. I learned that it is best if team members whose assets or assignments interconnect in the project work together closely or directly communicate as it can save time and confusion about the interconnecting details and there will be no confusion or incorrect measurements when put together. I also learned that building modular in the long term saves time in building game scenes quickly and efficiently.
Final Walk Through:
Final Project Game Scene Progress 6:
- Since Progress 5 I have finished:
- Unity uploading
- Audio uploading
- Unity scene organization
- Unity Images:


- Maya Issue:
- Most recent Maya file when opened the objects do not load, but there is information in the file.


- Plans moving forward
- Bake Lighting
- Maya file organization
- 1 minute fly through
- Turn in file organization
Final Project Game Scene Progress 5:
- Since Progress 4 I have finished:
- modeling
- UVing
- texturing
- Unity uploading
- Substance Images:
- Anubis Statue - 2K Map:


- Snake Dagger - 512 Mp:


- Columns -2K Map:

- Arches - 2K Map:

- Wall Relief - 2K Map:

- Pool, Pillar, Tapestry - 1K Map:

- Stairs - 1K Map:

- Torch - 2K Map:

- Unity:
- Plans moving forward are to:
- Finalize the sand storm particle effect in Unity
- Add the light and reflection probes
- Add ambient/sound effects to scene
- Add Ambient-occlusion and Anti-aliasing
- Import all Maya files together
- Organize Maya and Unity file
Final Project Game Scene Progress 4:
- Since Progress 3 I have finished texturing UV set 1 with a 512 map:

- I have also finished the fire particle system in Unity and am currently working on the sand storm particle effect in Unity:

- I have also made progress in modeling the Anubis statue:


- Plans moving forward are to:
- Finish texturing UV set 2
- Finalize the sand storm particle effect in Unity
- UV and texture the snake dagger
- Complete modeling, UVing, and texturing of Anubis Statue
Final Project Game Scene Progress 3:
- Since Progress 2 I have finished UVing for the UV 1 template:
- Roman Pool
- Pillar
- Grand Stairs
- Temple Stairs
- Tapestry

- For the UV 2 Template:
- Arch 01
- Arch 02
- Wall Relief with 3 Pillars
- Column 01
- Column 02
- Column 03
- Column 04
- Column 05
- Column 06
- Torch

- Moving forward I will:
- Start Texturing
- Model the Anubis sculpture
Final Project Game Scene Progress 2:
- Since Progress 1 I have UV'd:
- the Tapestry
- Roman Pool
- Pillar

- Torch
- Grand Staircase
- Temple Staircase
- I have also rem-modeled the Grand Staircase:

- Modeled the Snake Dagger:

- Moving forward I will:
- Finish UVing all models by April 9th
- Start modeling the Anubis sculpture
- Begin Texturing models by Wednesday
- Make a fire and dust particle system
Final Project Game Scene Progress 1:
- Triple A 3.73 or Group 2 has decided to recreate a level in the Assassins Creed Origins game.
- The level we chose is the Nile Delta level as we liked the idea of the level taking place on one of the islands in the Nile Delta.
- Image of the official Nile Delta Map:

- We researched the Nile Delta and we agreed on several images to use as our concept art.
- Concept Art:


- All team members have an asset list of objects that we are to model, uv, and texture.
- My list of assets:
- 6 Columns
- 2 Arches
- Wall Relief with 3 Pillars
- 2 Pillars
- 1 Grand Staircase
- 1 Temple Staircase
- Egyptian Pool
- Tapestry
- Torch
- I will be also working on creating the fire particles and dust particles for the scene.
- My progress is that I have modeled most of my assets but I still need to model:
- Snake Dagger
- Sculpture
- Proceeding forward I plan to:
- Finish the modeling and uving process by Sunday April 1st
- Start the texturing process by Monday April 2nd
- Images of the modeled assets:


Tower Post:
Assignment:
- The assignment is for our class to model three variations of a mobile game tower of our choice.
- We will make three variations to the towers topper to replicate the tower being leveled up in a mobile game as more design, objects, and details are added to each tower.
- The towers will level up from the first tower tier to the second tower tier and ending in the third tower tier.
- I created three variations of the same tower with the same tower base but three different tower toppers.
- I choose to model the Wizard Tower from the Isometric Tower Defense Game.
- The assignment had specifications that the the tower will have a maximum of 1,500 tri-count for all three versions of the game tower.
- With a maximum of 500 tris for the tower base and a maximum of 1,000 tris for the tower topper.
Problems:
There were three main problems I encountered with this project.
1. As I was texturing the three towers in Substance Painter I was painting the roofs, doors, window panes, and the shields different colors for each tower.
I encountered the problem where when I painted one tower’s UV the other towers faces were painted that same color and design as well.
I encountered the problem where when I painted one tower’s UV the other towers faces were painted that same color and design as well.
- I had to go back into Maya to move several UV's around so that certain pieces are not stacked on top of each other and are separate from each other.
- This solved this issue as I could now paint the faces different colors in Substance Painter without the faces on the other towers being painted the same color.
2. As I was reading the spec sheet for the assignment I realized the spec sheet said to do Diffuse for the Texture Maps, but the assignment page on Blackboard
said to do Base Color for Maps.
said to do Base Color for Maps.
- I went back into Substance Painter and re-exported the texture maps for the Base Color map instead of a Diffuse map.
- I then imported in the new texture maps into Unity and chose the Mobile Diffuse material option and then just added the Base Color map to this material.
- This solved this issue as the material successfully applied the Base Color map to the three tower meshes in Unity.
3. I encountered a problem when I was doing the Baked Light in Substance Painter
- I tried both ways as discussed in the video tutorial. The first way of dragging the Baked Light to the layer's Base Color.
- This did not work as when I baked the low poly as a high poly mesh it did not bake it correctly enough to do this method.
- The second method of using the Baked Light material worked to an extent.
- I adjusted and played with the lighting and material settings, but the result ended up being extreme in the results of either being too bright with little shadows or too dark with little highlighted detail on the three towers.
- The solution I came up with was to adjust the Baked Lighting in Substance so the result was on the brighter side and then in Unity I used the Baked Lighting settings to add more extreme shadows onto the three towers.
Visuals:


SciFi Hallway Post:
Assignment:
- The assignment is for our class to create a modular SciFi themed hallway of our choice.
- To create the modular hallway I made pieces that floated, or floaters, on the surface of UV'd objects in Maya that when baked with the objects as a high poly added the floaters detail to the baked objects in Substance.
- I decided to choose Halo's: The Truth and Reconciliation level as the reference for my SciFi modular hallway.
- The Truth and Reconciliation level takes place on a alien space ship.
- I based my SciFi level on it, but I took creative freedom and made changes to the design of the level by changing the layout of the level, the color, and the placement of objects in the level.
- Overall I wanted to go with a alien horror scifi level I did this with bloody hand prints on the doors and column, claw marks on the door, spooky ambient sounds with a fast heart beat, the overhead lights flickering on and off, and by adding lots of blood on the level.
- I made the level feel alienish by making the walls look slimy and with glowing effects.
Reference Images:


- I own the original Halo game and so I played the game and took photos and videos as I played the level.
- All concept art photos were taken by me Alicia Hill.
Problems:
There were three main problems I encountered with this project.
1. After I had textured all of the pieces in Substance Painter I realized two UV'd faces on the side piece were UV'd wrong and the top of the column's roof had shifted and was off center.
- I went back into Maya and fixed these issues, but I didn't know how to re-import the low and high poly maps without having to re-start the texturing process.
- Luckily a fellow CAGD 373 student showed me how to re-import the low poly mesh into Substance without effecting the texturing and then I just re-baked the high poly.
- This fixed the two UV faces and the column's roof.
- So I re-exported the texture maps with Unity 5 PBR MetalRough and re-applied them in Unity.
- I checked the coding and the options for the controller, but there was no option whether to invert the controls.
- I re-imported the first person character controller into the scene and it fixed the inverted controls, but later as I went into the Game scene the controls became inverted again.
Maya:

Substance Painter:

Unity:

Texture Maps:

Blacksmith Post:
Assignment:
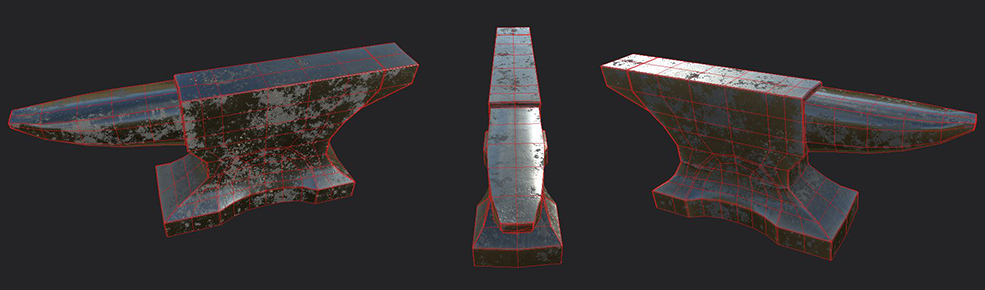
- The assignment is for the class to create the props for a Blacksmith scene for a game.
- In the assignment we were given a list of objects we needed to have in the scene and optional objects we could add to the scene but were not required.
- The required objects were:
o barrel
o bucket
o hammer
o wagon
o forge
o stool
o anvil
- The optional objects were:
o sword
o covered structure
- Along with the required objects we were also given a spec sheet with the maximum amount of faces our low and high poly meshes could have along with specific texture maps guidelines.
- The goal of the assignment was for the class to model, UV, texture, make a game scene in Unity, and to use a camera fly through to capture their scene.
- This allows us to experience the working flow of a game company that produces games using this process.
Anvil Visual:


Problems:
There were three
main problems I experienced with this assignment.
- 1. The first problem I encountered was with the hammer mesh. The problem was that when I baked the high poly mesh in Substance Painter the maps turned dark and wouldn’t bake correctly onto the hammer low poly mesh. I tried to solve this problem by:
·
making sure the UV map in Maya was in the
correct place
·
that the naming conventions were correct in
both Maya and Substance Painter
·
I tried adjusting the max frontal and rear
distance in Substance Painter as this worked with the wagon and anvil mesh.
o
However I could not get the high poly to bake
onto the low poly in Substance Painter and so I could not make the hammer have
only one texture map as it would not bake properly in Substance Painter.
Hammer Visual:


Hammer Visual:


- 2. The second problem I encountered is that the low and high poly forge mesh though it has a solid pane in Maya and in Substance Painter when I imported the mesh and textures into Unity the inside of the forge turned invisible so the viewers can see through the forge but just in the center opening part.
·
I tried to solve this problem by putting the
fire and embers in Unity into this opening.
o
This solution worked well as the flames blocked
the invisible opening.
Bucket Visual:


Bucket Visual:


- 3. The third problem I had was with the wagon low, medium, and high mesh. I encountered problems with this mesh in Maya, Substance Painter, and in Unity.
·
The problem I encountered in Maya was a Lambert
shader issue where two faces on the wheel cap were assigned to a lambert shader
that would not allow me to change it to a new material other than lambert.
o
The solution I found was that when I duplicated
the faces in Maya there were two inside faces that did not get the texture I
assigned to the rest of the wagon and so that is why there was a lambert shader
that wouldn’t go away until I deleted those faces.
·
The problem I encountered in Substance Painter
was that once I textured the high ploy mesh of the wagon in Substance Painter
with a wooden texture it caused the computer to continue in an endless loop of
that action and to freeze the computer at school so I could not end that
action.
o
The solution and only available option was to
hold down the power button to turn off the computer and then to turn back on
the computer.
o
However by doing this all of my files were
deleted that I was working on as when the computers turn off anything on the desk
top is wiped clean.
·
The problem I encountered in Unity is that when
I uploaded the wagon’s mesh and textures into Unity the textures did not turn out
as they did in Substance Painter.
o
I found this was because in Maya the low,
medium, and high wagon’s UVs were not correct and even though they showed the
textures applying correctly in Substance Painter it did not turn out in Unity.
o
The solution I found was to go back to Maya and
to re-do the low, medium, and high wagon’s UVs so that they are all identical,
then to re-bake the textures in Substance Painter, and then to re-import the
mesh and textures into Unity where the textures properly applied.
Wagon Visual:


Wagon Visual:


No comments:
Post a Comment