Blog Post 5:
Tasks:
- John Runion, the modeling teams lead, gave our modeling team an asset list and assigned multiple backlog cards among our modeling team members in Trello. These assets will be used to populate the many levels in our game Skate and Grind.
- During Sprint 1 I had completed the 3 different rail shapes and lantern assets. I was at the time currently working on the tree asset.
- During Sprint 2 I had finished the tree asset as well as the staircase and sci-fi cube assets.
- During Sprint 3 I had finished the metal railing, helipad, and satellite dish assets.
- During Sprint 4 I had finished the flower bed, lookout tower, town sign, spool, chess table with chairs, sci-fi bench, restaurant table with benches, and food cart assets.
- During Sprint 5 I had finished the sci-fi house, the two type warehouse roof assets, the rebar grind rails, the trash can asset, warehouse wall, triangular warehouse wall, and the playground asset.
- During Sprint 6 I had finished the Blank Street Sign asset.
Completed Tasks:
- The final task for Sprint 5 was the Blank Street Sign asset that had a medium priority in the asset list. I made sure that the uv of the street signs were separate so that when the level designers stamp on the name of the streets they can put a different street name on each street sign. I used a concrete texture and around 30% opacity of the stylized steel texture for the metal pole and metal brackets on the street sign. I used a colored metal texture for the street signs that I changed the color of the texture to white for the outer edges of the street sign and then I changed the color of the texture to green for the inner part of the street sign.

Tasks in Progress:
- I have no current tasks in progress at this time.
- The modeling team has completed the last of the assigned asset tasks before the cut off day and time.
Incomplete Tasks:
Issues/Problems/Solutions:
- There are currently no uncompleted tasks and all completed tasks have been turned in on time.
Issues/Problems/Solutions:
- A problem I encountered with the Street Sign model was with the metal brackets models and uvs. I had an issue modeling the metal brackets as I had to hollow out the metal bracket so that it went over and around the street signs on the top of the model.
- The uving problem I had with the street sign was that when I stamped the alpha bolts onto the metal brackets it kept appearing on the street sign uvs.
- The solution I came to for the modeling problem was to move the top face downwards to the width I needed and then I inserted edge loops around the edges of the metal brackets and then I moved the four outer faces upwards to the height I needed.
- The solution to the uving problem was that I had stacked all of the metal brackets faces on top of each other so I separated them so the bolts only appeared on the horizontal faces of the metal bracket. I also went in and erased the bolt alpha stamp on the street uv so that the bolts are only on the horizontal faces of the metal brackets.
Blog Post 4:
Tasks:
- John Runion, the modeling teams lead, gave our modeling team an asset list and assigned multiple backlog cards among our modeling team members in Trello. These assets will be used to populate the many levels in our game Skate and Grind.
- During Sprint 1 I had completed the 3 different rail shapes and lantern assets. I was at the time currently working on the tree asset.
- During Sprint 2 I had finished the tree asset as well as the staircase and sci-fi cube assets.
- During Sprint 3 I had finished the metal railing, helipad, and satellite dish assets.
- During Sprint 4 I had finished the flower bed, lookout tower, town sign, spool, chess table with chairs, sci-fi bench, restaurant table with benches, and food cart assets.
- During Sprint 5 I had finished the sci-fi house, the two type warehouse roof assets, the rebar grind rails, the trash can asset, warehouse wall, triangular warehouse wall, and the playground asset.
Completed Tasks:

- At the start of Sprint 5, I finished the sci-fi house task that had a high priority in the asset list. I created a house model that I used a spaceship texture for the walls, a sci-fi virus texture for the door and trim of the roof, and for the roof I used a sci-fi panel texture. For the windows, I used the glass visor texture with an emissive map to make it glow.

- The second task I completed was the two type warehouse roof task that had a medium priority in the asset list in excel. For this asset, I modeled two versions of the warehouse asset. One asset has a roof with lights underneath the roof and the second asset has no lighting underneath the roof. I used a wood panel texture for the bottom of the warehouse and a stylized steel texture for the roof. I also used an emissive glowing texture for the light part underneath the roof.

- The third task I completed was the rebar grind rail task that had a medium priority in the asset list in excel. For this asset, I modeled two versions of the rebar grind rail asset. The difference between the two rebars is that they each have a different pivot point so that if the level designers need to place each section of the rebar in the level they can do so in a modular design. I used a steel texture that had a circular design for the rebar and for the metal rings holding the rebars I used an oily oxidized metal texture.

The fourth task I completed was the trash can asset that had a low priority in the asset list. I used a stylized steel texture for the inner part of the trash can that I made to have a green hue to it. For the outer part of the trash can, I used a wooden cherry texture. I also stamped an alpha in the shape of a bolt onto the outer part of the trash can.

The fifth task I completed was the warehouse wall and triangular warehouse wall tasks that had a high priority in the asset list in excel. I decided to do these two tasks together as the only difference between the two tasks is the shape. The middle image is the square section of the wall that is modular for the level designers to tile to make a warehouse wall. While the top image is the triangle section of the wall so that it will fit with the roof of the warehouse. The last image on the bottom shows both the square tiles and triangular shapes with on the left the corrugated steel and on the right with the rusted metal texture. I used two textures one a corrugated steel and the other a rusted metal texture for both square and triangle assets so that they can be stacked horizontally or vertically while giving the level designers two textures to choose from.


The final task for Sprint 5 was the playground asset that had a medium priority in the asset list. I made each part of the playground into its own model, texture, and prefab so that the level designers can make customized playgrounds with these separate prefabs. I used a mixture of textures in this asset. I used a variance of different colored plastic matte textures for the slide, see-saw, monkey bars, spinning circle ride, bouncy seat, and the swing set. I used a steel texture for the bottom part of the see-saw, the spinning circle ride, and the bottom spring of the bouncy seat. I used a concrete texture for the outer border of the playground and a sand texture for the center part of the ground beneath the playground.

Tasks in Progress:
- I have no current tasks in progress at this time.
- I did assign myself a new task for the Blank Street Sign task for all of the levels, but I have not yet started this new task.
Incomplete Tasks:
Issues/Problems/Solutions:
- There are currently no uncompleted tasks and all completed tasks have been turned in on time.
Issues/Problems/Solutions:
- An issue I encountered with the two types of warehouse roofs task was a miscommunication. The problem was that in the task description it asked for two types of warehouse roofs one with lights and one without, however they did not specify if they wanted the warehouse building to be modeled along with the warehouse roofs.
- A problem I encountered in the playground task was that the ploy count was too high with all the assets making up the playground
- After I fixed the poly count problem I realized that while the number of faces in the scene was going down, but the number of vertexes stayed the same.
- The solution I came to was to make four assets prefabs in Unity. Two of the assets were the warehouse roofs only one with lights and the other without lights. The other two assets were the same except that they had the warehouse building along with the roofs.
- The solution to the too high poly count problem was to delete half of the edges of the cylinder and round meshes. This lowered the number of faces in the scene to less than a thousand for each asset in the playground.
- The solution to the vertexes problem was that I selected the vertexes that remained on the meshes after I had deleted the edges and then I deleted them. This lowered the number of vertexes in the scene.
Blog Post 3:
Tasks:
- John Runion, the modeling teams lead, gave our modeling team an asset list and assigned multiple backlog cards among our modeling team members in Trello. These assets will be used to populate the four levels and the overworld level in our game Skate and Grind.
- During Sprint 1 I had completed the 3 different rail shapes and lantern assets. I was at the time currently working on the tree asset.
- During Sprint 2 I had finished the tree asset as well as the staircase and sci-fi cube assets.
- During Sprint 3 I had finished the metal railing, helipad, and satellite dish assets.
- During Sprint 4 I had finished the flower bed, lookout tower, town sign, spool, chess table with chairs, sci-fi bench, restaurant table with benches, and food cart assets.
Completed Tasks:

- At the start of Sprint 4, I finished the metal railing task that had a medium priority in the asset list. I created a metal railing with a top metal bar that the player can grind on with a stylized metal texture.

- The second task I completed was the helipad task that had a low priority in the asset list. I created a round helipad with a grey and yellow ground texture with a white alpha used to stamp the H on the helipad.

- The third task I completed was the sci-fi satellite dish that had a medium priority in the asset list. I created a low poly sci-fi satellite dish as it would be out in the distance and will not be seen by the player close up. I used a glowing sci-fi metal material for the satellite dish and a metal grid texture for the base of the satellite dish.

- At the start of Sprint 5, I finished the flower bed task that had a medium priority in the asset list. I created a metal railing with a top bar that the player can grind on that goes around the flower bed. I changed the color of the flower texture for the different colored flower beds and used a stone with grass texture for the base of the flower bed as well as a stylized metal texture for the metal railing around the flower bed.

- The second task I completed was the lookout tower that had a high priority in the asset list. For this asset, I created two versions of the lookout tower. One asset has a stylized metal railing (left lookout tower in the image below) and the second has an orange wall texture (right lookout tower in the image below). The reason I made two lookout towers was for the level designers to be able to vary the look of the lookout towers on the level. For both lookout towers, I used a stylized brick wall texture for the main body of the lookout tower with a stylized metal texture for the AC unit on top and with alpha graffiti.

- The third task I completed was the town sign task that had a high priority in the asset list. I worked with the 2D artist for her to make a JPEG file of the name the town Shred Ville and the Welcome so I could make an Alpha stamp and apply it to the town sign. I used a stylized steel texture for the side parts of the sign, a green stylized metal texture for the main body of the town sign, a white texture for the outline of the sign, graffiti alpha stamps on the back of the sign, and a alpha stamp of the name of the town and welcome on the front of the sign.


- The fourth task I completed was the spool task that had a low priority on the asset list. I used a wooden texture for the top and bottom part of the spool and for the middle part I used a rope texture.

- The fifth task I completed was the chess table task, I also modeled and textured a chair for this asset, that had a medium priority in the asset list. I used a stylized metal texture for the chess table and the chairs and I used a marble texture for the chess set.

- The sixth task I completed was the sci-fi bench task that had a medium priority in the task list. I used a grey cement texture for the main body of the sci-fi bench with a light salamander pink texture for the inside of the sci-fi bench and an orange cement texture for the middle parts of the sci-fi bench.

- The seventh task I completed was the restaurant table, I also modeled and textured a bench for this asset, that had a medium priority in the asset list. I used a wooden texture for the table and benches with a stylized metal texture for the support beams and umbrella stand, and a yellow cloth texture for the umbrella.

- The eighth task I completed was the food cart task that had a high priority in the asset list. I used a stylized gold steel texture for the support beams of the cart, a red metal texture for the cart, a stylized grey metal steel for the top of the cart, a rubber and dirty white texture for the wheels of the cart, and handpainted stripes for the top cloth of the cart. I also used an alpha for the hot gods, the name of the cart, and for the menu.

Tasks in Progress:
- I have no current tasks in progress at this time as I have finished all assets I have been working on in Sprint 4.
Incomplete Tasks:
Issues/Problems/Solutions:


- There are currently no uncompleted tasks and all completed tasks have been turned in on time.
Issues/Problems/Solutions:
- An issue I encountered with the food cart asset was the top cloth material in Substance Painter. The problem was that in Substance Painter when I tried to use an alpha stamp of stripes onto the cloth the stripes would not perfectly line up as the UVs of the cloth was UVd in portions and not as a whole.
- The solution for the food cart was that I used a square brush to paint on the red stripes to the cloth material on the top of the food cart.
- The second issue I encountered was that the metal railing I used in the flower bed asset had a top rail with rungs in between. The issue was that the poly count was too high for this asset.
- The solution for the flower bed asset was to go into the mesh and to delete half of the middle rungs in between to cut down on the number of polys in the asset. The first image is before I lowered the poly count and the second photo is after I lowered the poly count.


Blog Post 2:
Tasks:
- John Runion, the modeling teams lead, gave our modeling team an asset list and assigned multiple backlog cards among our modeling team members in Trello. These assets will be used to populate the many levels in our game Skate and Grind.
- During Sprint 1 I had completed the 3 different rail shapes and lantern assets. I was at the time currently working on the tree asset.
- During Sprint 2 I had finished the tree asset as well as the staircase and sci-fi cube assets.
Completed Tasks:
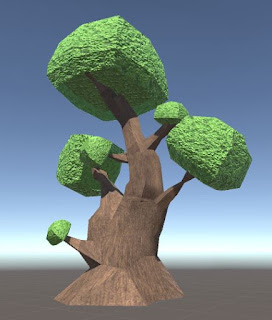
- At the start of Sprint 2, I finished the Tree task that had a medium priority in the asset list, but there was no reference or concept image for the tree. I created a tree trunk with branches that led to leafy treetops with stylized wood and grassy textures.

- The second task I completed was the Staircase task that had a low priority in the asset list in excel. For this asset, I created two versions of the staircase. One asset had no top railing (right staircase in the image below) and the second had a top railing (left staircase in the image below). The reason I made two staircases was for them to be modular and when I was testing the modularity in Maya I realized I needed a staircase with a top rail as a middle section in the modular design as well as to indicate where the staircases stop at the top. For both staircases, I used a stylized steel texture for the main body of the staircases with a light wooden texture for the rails, and for the top steps, I used a mesh grate texture.

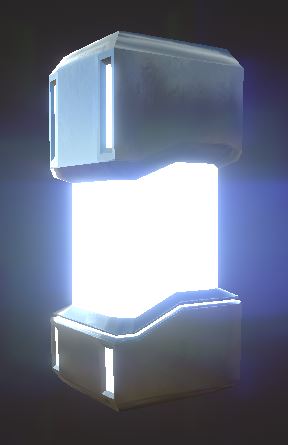
- The third task I completed was the Sci-fi Cube task that had a low priority in the asset list in excel. I used a stylized steel texture for the main body of the Sci-fi cube on one material map and then I used an emissive glass visor texture on another material map so only the middle and small panes would have emissive properties and glow in Unity.

Tasks in Progress:
- I have no current tasks in progress at this time. I'm currently waiting for a new backlog card in Trello so I can start the next task.
Incomplete Tasks:
Issues/Problems/Solutions:
- There are currently no uncompleted tasks and all completed tasks have been turned in on time.
Issues/Problems/Solutions:
- An issue I encountered with the Sci-fi Cube was the emissive properties in Unity. The problem was that in Substance Painter the emissive channel had a definitive glow to the parts on the Sci-fi Cube, but in Unity, there was only a slight glow to the Sci-fi Cube and I wanted a more definitive glow like it had in Substance.
- The solution for the Sci-fi Cube was that I googled the emissive channel in Unity and watched tutorials on Youtube and read articles from Unity's website as well as user forums and blog posts. From these sources I tried changing the lighting settings, adding a pin light, changing the material settings of the material assigned to the object, changing the material from Standard to Lightmapped, and changing the export settings from Substance. Unfortunately, none of these worked to fix the glow in Unity. The only one that had a visual difference was the pin light setting solution, but it casted a blue glow onto the Sci-fi Cube and I realized it would do the same to the other objects when imported into the game so that solution was not viable. Overall there was no solution I could find to fix the emissive intensity in Unity for a larger glow on the Sci-fi Cube.
Blog Post 1:
Tasks:
- John Runion, the modeling teams lead, assigned two backlog cards in Trello. In the first backlog log called General Assets -Sprint 1 card I chose to do the Grind Rails task.
- For the second backlog card Construction City Assets - Sprint 2 card I chose the Colored Lantern task.
- For the third backlog card Construction City Assets - Sprint 2 Part 2 card I chose the Tree task.
Completed Tasks:


- For the Grind Rails I created a separate modular straight, left curve, and right curve grind rail with stylized textures and graffiti designs.


- For the Colored Lantern I did separate materials with a steel texture for the body of the lantern and a transparent colored texture for the glass. As well as a fire and glow particle effect in Unity for the flame.

Tasks in Progress:
- The Tree task is currently in progress, but is not due until September 27th.
Incomplete Tasks:
Issues/Problems/Solutions:
- There are currently no uncompleted tasks and all completed tasks have been turned in on time.
Issues/Problems/Solutions:
- An issue I encountered with the Colored Lantern was the transparent glass. The problem was that I originally put the Colored Lantern mesh in one material texture set and so when I made the glass transparent in Unity it made the entire lantern slightly transparent including the steel parts, but the glass was only slightly transparent and not transparent enough.
- The solution for the Colored Lantern was that I went back into Maya and made two material texture sets, one for the steel part and the second for the glass part of the lantern. Then in Unity I changed the material set from Standard mode to Transparent mode for the glass material texture set and this fixed the transparency issue.
No comments:
Post a Comment